Ohai,
Welcome to the online manual from Pockethernet
Structure
The Manual describes each feature as it appears in the app. In the menu you'll find the different tabs that correspond with the tabs in your app and it's features. If you just want to get started quickly, head over to getting started to quickly learn the basics of pairing your Pockethernet and start testing.
Where to start?
- Have a look at this Walkthrough video, which shows all features and essentials in 3 minutes
- Head over to our FAQs to see if your question is in there
- Look up the feature you're having issues with and see if the answer to your question is in there
- Head over to our support forum. There's a lot of users who can help and we're active on there as well
- Still can't figure it out? Drop us an email (Please take note that we're a small company, so it sometimes takes more than 24 hours before you'll get a reaction)
Safety instructions
Safety precautions- To prevent fire or shock hazard, avoid exposing this unit to rain or moisture.
- Do not attempt to service this unit yourself. Please refer all servicing to your distributor / retailer.
- Do not open or disassemble the device. There are no user serviceable parts.
- Do not use strong or abrasive detergents when cleaning the device.
- Indoor use only.
- Risk of fire, explosion, and burns. Do not disassemble or crush.
- Use a certified power adapter only. Voltage and current requirement for charging and operation is 5V at 1A.
- Do not use the USB and the Ethernet connector at the same time (unplug Ethernet while charging)
- The device must only be connected to a Network Environment 0 per IEC TR62101.
- Do not connect to cables that are routed outside of a building.
- Do not connect to telecommunication networks or cable distribution systems
- Risk of explosion if battery is replaced incorrectly
- Dispose of used battery according to regulations
This device complies with part 15 of the FCC Rules. Operation is subject to the following two conditions: (1) This device may not cause harmful interference, and (2) this device must accept any interference received, including interference that may cause undesired operation. This Class B digital apparatus complies with Canadian ICES-003.
FCC Notice
This equipment has been tested and found to comply with the limits for a Class B digital device, pursuant to Part 15 of the FCC rules. These limits are designed to provide reasonable protection against harmful interference in a residential installation. This equipment generates, uses and can radiate radio frequency energy and, if not installed and used in accordance with the instructions, may cause harmful interference to radio communications. However, there is no guarantee that interference will not occur in a particular installation. If this equipment does cause harmful interference to radio or television reception, which can be determined by turning the equipment off and on, the user is encouraged to try to correct the interference by one or more of the following measures: Reorient or relocate the receiving antenna. Increase the separation between the equipment and the receiver. Connect the equipment into an outlet on a circuit different from that to which the receiver is connected. Consult the dealer or an experienced radio/TV technician for help.
Disposal and Recycling Information
When this product has reached the end of its useful life, please dispose of it according to your local environmental laws and guidelines and take it to a collection point designated by local authorities. Some collection points accept products for free. The separate collection and recycling of your product at the time of disposal will help conserve natural resources and ensure that it is recycled in a manner that protects human health and the environment.
Disclaimer
This manual has been compiled and published covering the latest product descriptions and specifications. The contents of this manual and the specifications of this product are subject to change without notice. We reserve the right to make changes without notice in the specifications and materials contained herein and shall not be responsible for any damages (including consequential) caused by reliance on the materials presented, including but not limited to typographical and other errors relating to the publication.
Getting Started
Pairing Pockethernet with your device
Android
- Turn the Pockethernet unit on
- Open the App
- Long-press the Connect button in the app to go your devices' Bluetooth menu
- Enable Bluetooth
- Scan for bluetooth devices and perform a pairing (No PIN code is required)
- Go back to the application and push the connect button to establish the connection
- Pockethernet is ready to use
iOS
- Turn the Pockethernet unit on
- Turn on Bluetooth
- Open the App
- Push the connect button to establish the connection
- Pockethernet is ready to use
Compatibility
iOS
- iPhone 4S and more recent
- iPod touch 5th generation and more recent
- iPad 3rd generation and more recent
Android
- Requires Bluetooth 2.1 classic compatible with Android 4.3 or higher.
The Pockethernet app needs BLE (bluetooth 4.0) to communicate with your device. Bluetooth 4.0 (BT LE), also known as Bluetooth Low Energy and Bluetooth Smart is omnipresent in almost all smartphones and tablets since 2011.
App user interface
The app consist of three main sections: Test, Report and Tools.
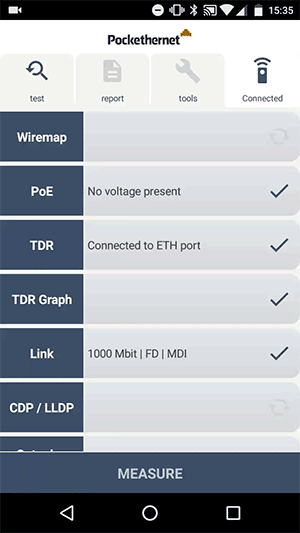
Test tab
- The test tab has a separate row for each measurement
- You can expand and close the detail section of a test by clicking on the header on the left
- The icon in each row represents 4 possible states (Not selected, selected, measuring in process, test finished)
- The grey refresh icon means the measurement is not selected, click the icon to include the test in the next measurement cycle
- Once the test is successfully performed, the icon will turn into a checkmark. All checkmarked results will be included in the report.
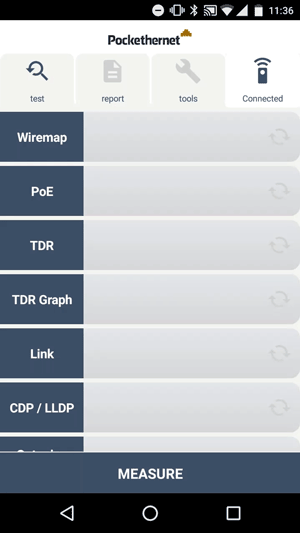
Different states
Unselected test
Test selected
In progress
Succesfull
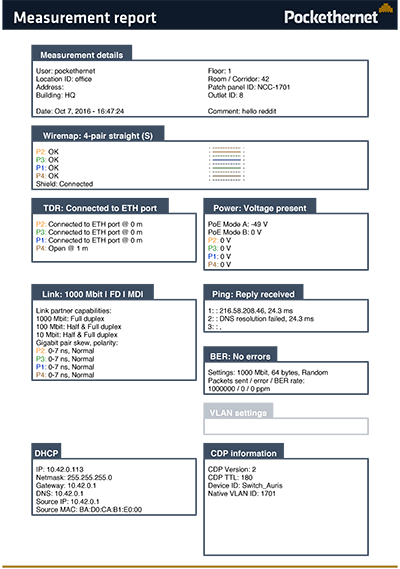
Report tab
In the report pane you can create a report on the measurements performed in the test tab. All tests which have a checkmark in the test tab will be included. In the process of creating a report you can enter additional details about the measurements such as;
- Location, patch panel and outlet ID
- Address details
- Take or insert a photo
- Comments
The report can be viewed directly, shared via any application that supports sending files, or saved locally on your device. To view, send or delete any of the last 50 created reports click "saved" in the report menu
Tools tab
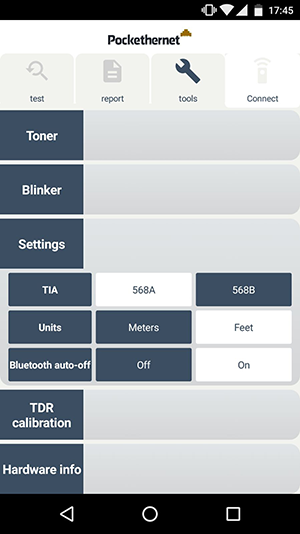
This tab offers utility functions and settings. The toner and blinker feature can both be found here. Besides that you can see and define;
- The measurement unit (meters or feet)
- TIA settings (568A or 568B)
- Bluetooth auto-off (decide if the app should switch off bluetooth when Pockethernet is disconnected)
- TDR calibration
- Hardware info
In-app help
Long click on any feature to open the in-app help function
Do a quick measurement
To do a quick measurement without the smartphone application connected, press the On/Off button briefly. Results are shown on the wire pair status LEDs.
| Status | Possibe Faults |
|---|---|
| Red | Voltage > 10V present on the pair |
| Green | Pair termination within tolerance, pair connected to another Ethernet port |
| Yellow | Pair open, unconnected |
| Magenta | Pair has termination error (bad cabling, non-Ethernet port, 10/100 spare) |
| Blue | Ethernet link established on port |
| White | Ethernet link established and DHCP address obtained on port |
Start testing
- Pair Pockethernet
- Go to the test tab and select which tests you'd like to run by clicking on the
- Hit the measurement to start the test
The device
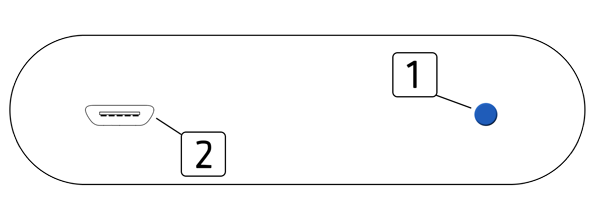
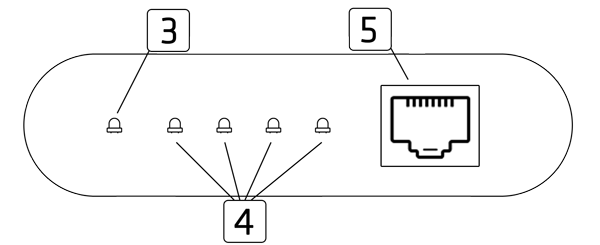
(1) Power button
Use this button to switch the device on and off or reset it in case of software failures.
| Status | Action |
|---|---|
| On | When the device is switched off, press it briefly to switch it on |
| Off | When the device is powered on, press it for 3 seconds, until the device turns off |
| Reset | Should the device show symptoms of software failure (not going through the measurement cycle, charging or communicating with the smartphone application), you can reset the device by pressing and holding the button for 10 seconds |
| Flashlight | Press the button two times quickly to turn on all wire pair LEDs in a bright white light |
| Quick measurement | To do a quick measurement without the smartphone application connected, press the button briefly. Results are shown on the wire pair status LEDs |
(2) USB port
Connect to a USB port or a USB power supply to charge the built-in battery. The device status LED shows the charge state. The port is also used for performing firmware upgrades. Visit our website to find the latest firmware version)
(3) Power status LED
This LED is on, when the device is powered on, and shows the battery state. Colors indicating the states:
| Status | Possibe Faults |
|---|---|
| Blue | Charging |
| White | Fully charged |
| Red | Charging error |
| White | Power remaining >80% |
| Green | Power remaining >50% |
| Yellow | Power remaining <50% |
The charging time from a completely empty battery to 100% is 2 hours
(4) Ethernet wire pair status LEDs
After a 'quick measurement' each of the LEDs show the state of a wire pair in the cable On the left is Pair 1, on the right is Pair 4.Colors indicating the states:
| Status | Result |
|---|---|
| Red | Voltage > 10V present on the pair |
| Green | Pair termination within tolerance, pair connected to another Ethernet port |
| Yellow | Pair open, unconnected |
| Magenta | Pair has termination error (bad cabling, non-Ethernet port, 10/100 spare) |
| Blue | Ethernet link established on port |
| White | Ethernet link established and DHCP address obtained on port |
(5) Ethernet port
Plug in the Ethernet cable that you’d like to test here
Reset the device
Should the device show symptoms of software failure; not going through the measurement cycle, not charging or communicating with the smartphone application. Press and hold the power button (1) for 10 seconds and then connect the USB cable to reset the device.
Device specifications
| Dimensions | 90x65x25 mm |
| Weight | 200 grams |
| Charging | Micro-USB charge |
| Operating time | 8 hours on full battery |
| Voltage measurement | up to 110V |
| TDR range results evaluated | min. 1m (3ft) - max. 110m (330ft) |
| TDR graphing | min. 1m (3ft) - max. 300m (1000ft) |
| Ethernet standards | 10BASE-T, 100BASE-TX, 1000BASE-T |
| Connectors | RJ45, 3.5 mm jack, USB micro-B |
| iOS compatibility | iPhone 4S and above, iPod touch (5th generation or higher) |
| Android compatibility | BLE compatible running with Android 4.3 or higher. |
How to update the Firmware
- Go to tools tab in the app and select Hardware info to read out your current firmware version
- Go to the Pockethernet website, to see if you're using the latest firmware
- In case you need to update your firmware, download the firmware installer from the forum and follow the instructions below. (currently linux / windows only)
Windows
- Do not connect Pockethernet to the USB port yet!
- Download the zip package and extract it to any folder
- Driver installation for Windows 7 and 8 only: Open the folder in a Windows file explorer, right click "Pockethernet Driver Beta.inf", select "Install". Confirm installation. (No actual driver binary needs to be installed, the inf file only instructs Windows to use its built-in USB CDC serial driver with Pockethernet) Windows 10 already has the necessary driver built-in.
- Start the application, "Pockethernet Firmware Updater vXY.exe" (Needs the .NET framework 4 installed)
- Connect Pockethernet to the USB port
- The firmware updater should recognize the device and show its serial number and current SW version
- Click the 'Start Update' button
- during the upgrade process, all 4 wire-pair LEDs turn blue. After a succesfull upgrade, the LEDs turn green (or red if there was a failure during the upgrade)
- Once the update has finished, disconnect Pockethernet from the USB port
Linux
The updater is a single 64-bit executable, also containing the firmware image for the device- Download the archive file
- Extract the file 'pockethernet-XYy-fwupgrade'. If needed, make it executable ($ chmod +x pockethernet-vXY-beta-fwupgrade)
- Plug in Pockethernet to the USB port and check dmesg or the system log to see which tty device it has been assigned (usually /dev/ttyACM0)
- Run the updater with "./pockethernet-vXY-beta-fwupgrade /dev/ttyACMx"
- During the upgrade process, all 4 wire-pair LEDs turn blue. After a succesfull upgrade, the LEDs turn green (or red if there was a failure during the upgrade)
The app - Test View
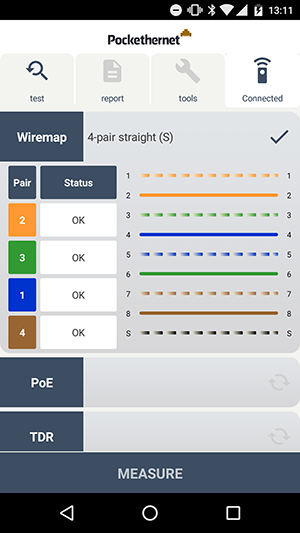
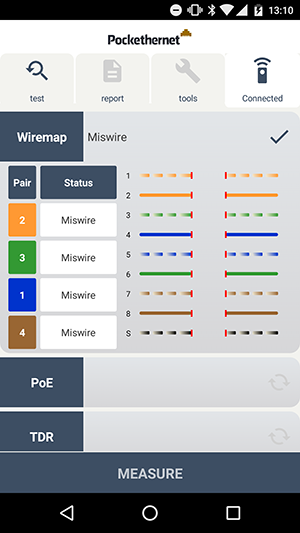
Wiremap
The wiremap test determines (by transmitting signals through each wire) if a pin on a connector is connected to the correct pin at the other end.
| Status | Possibe Faults |
|---|---|
| Miswired | Damaged connector / Cuts or breaks in cable / Wires connected to wrong pins at connector or punch block |
| Short Circuit | Improper connector termination / Damaged Connector / Conductive material stuck between pins at a connection / Damage to cable |
| OK | There's a connection to the wiremap-Adapter |
The graphical wiring diagram shows the status of each individual wire: the corresponding connected pin is shown on the right side. In case of short circuits between the wires, these are shown with a red vertical connection, opens are shown in the middle as a break in the line.
The pair numberings and colors are based on the TIA colour scheme selected in the tools -> settings menu.
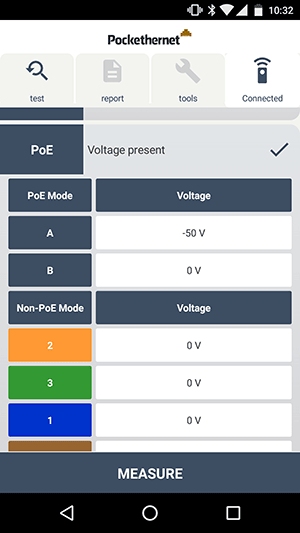
PoE
This test verifies the presence of a Power over Ethernet supply in mode A (pairs 2+3/Endspan) or mode B (1+4/Midspan) and reports the voltage measured. Additionally, voltages are also measured on each wire pair separately (e.g. pins 1+2, 3+6,...) to detect the presence of analog phone lines.
The PoE results - if present - are shown in the main summary line of the measurement, the individual pairs in a table below.
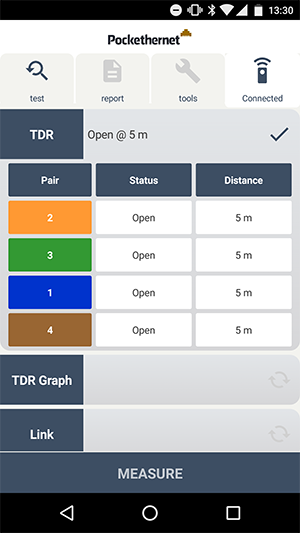
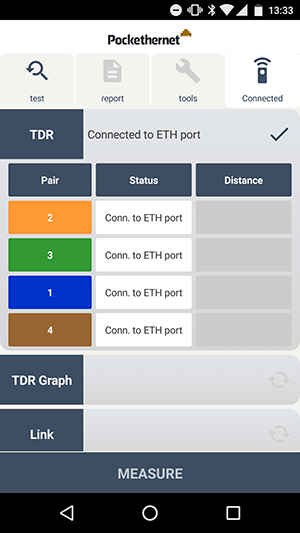
TDR
The TDR-based, single ended length measurement and fault locating tests the physical properties of a cable, with just one end connected to Pockethernet. See how long the cable is and if there are any short circuits, split pairs or bad terminations. Pockethernet also detects if the cable is connected to a switched off computer or switch.
The main status line shows the overall result of the measurement if each pair in the cable is terminated the same way (e.g. all pairs are open or connected)
| Status | Possibe Faults |
|---|---|
| Open | Cable is not connected to anything |
| Short Circuit | There's a short circuit somewhere in the cable |
| Connected to ETH port | Cable is connected to a Ethernet port |
| Bad Termination | There's a bad termination. The cable might be connected to a broken ethernet device/bad cableing installation |
The length cannot be determined if the cable is connected to another Ethernet port, as a properly terminated connection doesn't provide signal reflections that can be measured. Also, switched on Ethernet ports on the other end can provide false results as the other device is actively transmitting signals that interfere with the measurement.
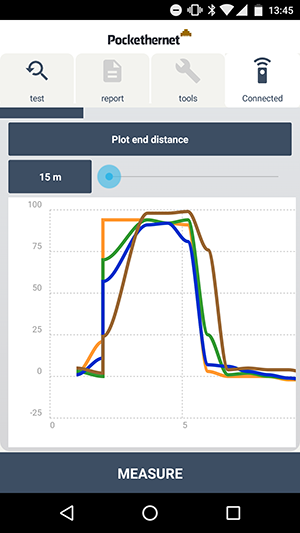
Graphical TDR
This features allows you to measure the imperfections of a cable along its whole length or a section of it. A short electrical pulse is sent down the cable, which is reflected from imperfections (short circuits, split pairs, impedance mismatches, open ends) or absorbed by proper termination (another ethernet port). The cable is measured from its beginning until the distance that is set by the slider. For a distance up to 30 meters / 100 feet, a high-resolution plot is conducted. The maximum distance is 300 meters / 1000 feet.
On the plot graphics, the horizontal axis shows the distance, while the vertical axis shows any reflections of the initial test pulse. The 4 color lines correspond to the 4 wire pairs in the cable according to the TIA settings. Short circuits show up as a negative reflection, open ends as a positive one, while with a proper termination the graph is completely flat.
Small imperfections in the +/- 10 range can be caused by cable extenders or patch panels, which can be conveniently detected by this feature.
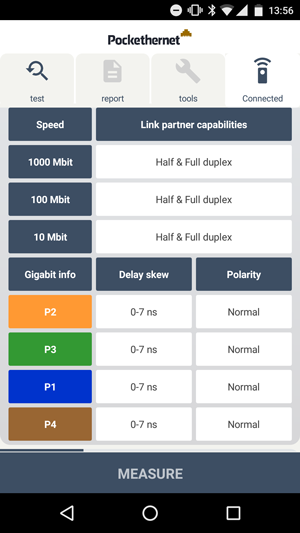
Link
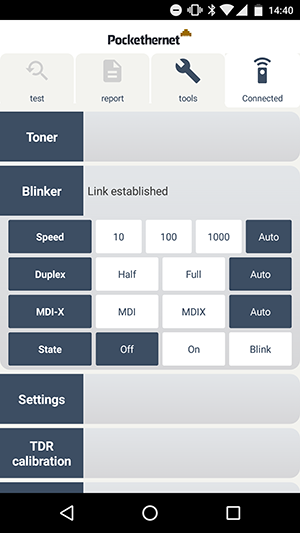
This test determines if an ethernet link can be established, what the highest achievable speed is. The result is shown in the summary line: 10 / 100 / 1000 Mbit, Full Duplex / Half Duplex, MDI / MDI-X.
On gigabit links, additional information is shown: The delay skew of each pair (maximum allowed per IEEE specification is 45ns) and the polarity of each wire pair, which helps detecting any wiring errors.
CDP/LLDP
When activated, Pockethernet waits for up to 65 seconds after link establishment to receive CDP or LLDP packages.
These diagnostic packages contain information about the connected switch or router, like the physical port ID Pockethernet is connected to, the system name or management IP address. Information fields, called TLVs of the received packet are listed in the details section of this measurement.

VLAN tag
By activating this option, you can set up Pockethernet to use 802.1q VLAN tagging for any outgoing packet of DHCP requests or pings.
This allows you to test the network connectivity on a specific VLAN (ID), while also defining the packets priority (PCP: 0-7) and the Drop eligible indicator (DEI).
If the port is in access/untagged mode, the VLAN tags are removed by the switch before sending out the packets, hence they are not detectable by the device. If configured for the port, Pockethernet can receive CDP or LLDP information, which usually includes the native VLAN ID. If the port is in trunk/tagged mode, or is an access port also carrying tagged packets, you can use the traffic monitor feature to see the VLAN IDs of frames that are sent over the link
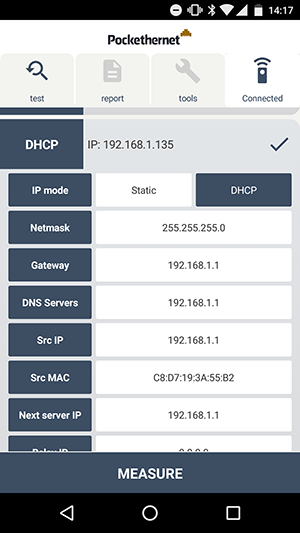
DHCP / static IP
This section allows you to test the networks DHCP settings and make Pockethernet request its IP configuration via DHCP, or you can set up static IP settings to be used for the ping tests.
In case of DHCP, the DHCP offer from the server is parsed and all important fields (e.g. server IP and MAC address, lease times, further servers) are listed in the details.
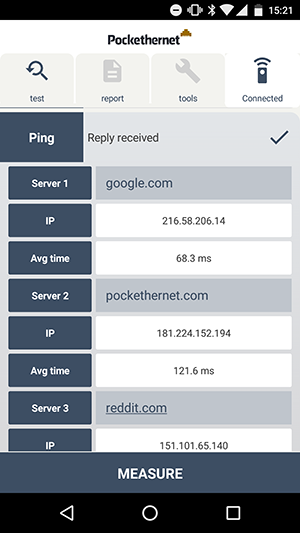
Ping
You can enter up to three IP addresses or domain names to be pinged.
The results include the pinged IP address (so that this test can also be used for DNS resolution) and the average ping time of 3 measurements.
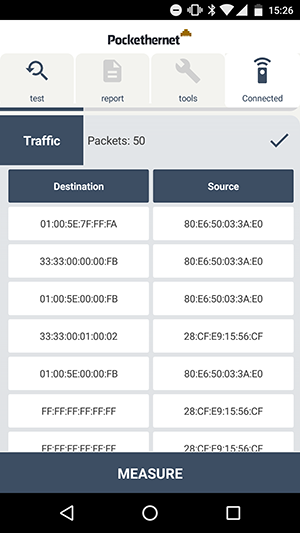
Traffic
The traffic sampling feature allows you to see samples (i.e. not all packets are forwarded to the APP) of the network traffic. Pockethernet will wait for 60 seconds and forward some of the the incoming packets to the app, where the destination and source MAC address are displayed along with any VLAN tag and the ethernet protocol/frame size field.
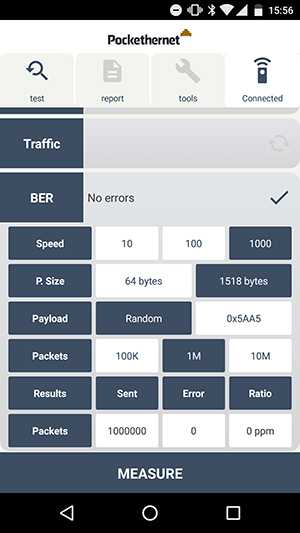
BER - Bit Error Rate test
The Bit Error Rate Test measures the overall quality of a cable run by sending and receiving large amount of ethernet frames and measuring how many of them get corrupted along the way.
For this measurement, you need to connect the 'Loopback' side of the Pockethernet terminator device to the far end of the cable
To test different scenarios, you can configure the link speed which is used, the packets length and contents (fixed pattern of 0x5AA5 bytes or a pseudo-random sequence). The ratio of packets with CRC errors will be displayed in percent or ppm (parts per million) and is a directly proportional to the cabling quality.
The App - tools overview
Toner
The toner function allows identification and tracking of cables via an electronic signal that can be picked up with a tone probe. You can use it to identify individual cables in a bundle, identify individual wire pairs and track their path in culverts and walls. You can select on which wire pair the signal should be transmitted, which tone should be used at what volume. You can use any analogue tone probe to pick up the signal.
As the signal can radiate into nearby cables, use the minimum volume that is still trackable to more easily distinguish cables.
Blinker
You can use this function to identify the ethernet port on switches and routers to which the cable is connected, by making the link LEDs blink. As a secondary function, you can manually test if a link can be established at specific speeds and duplex settings.
Settings
| TIA | Set the color scheme and pair numbering according to the TIA-568 A or B standard |
| Units | Set distance units in meters or foot |
| Bluetooth auto-off | Choose if the app should automatically switch off Bluetooth when Pockethernet is disconnected |
TDR calibration
This allows you to calibrate the TDR distance measurement and to adjust for the NVP of the currently inspected cable. As the 4 wire pairs in a cable have different twist rates and therefore different length, they can be adjusted separately.
For the calibration process, you need to connect a cable with all 4 pairs disconnected and of at least 5 meters length. Then press the Measure button, wait for the results and adjust the sliders of each pair, so that the 'Calibrated' values match the actual length of the connected cable.
Hardware Info
You'll find the details on your hardware version, firmware and MAC address of your Pockethernet in here.
The App - Report overview
Export your results
The report tab is the place to export your test results. You can download all your data to a PDF or share them through other applications on your phone with the press of a button. In the report tab you can add comments and more details of the test environment that will make it easier for you to identify the results afterwards.
To export your measurement report:
- Do your desired testing. All tests which contain a checkmark at the point of creation will be included in the report.
- Click on the report tab
- Add comments / details
- View or send PDF measurement report
- Select how you'd like to send the report in the sharing menu